Pages

Showing posts with label homemade materials. Show all posts

Thursday, September 24, 2015

introducing the alphabet, Montessori-style


The ability to isolate a beginning sound of a word is the point of readiness for learning the alphabet letter sounds.
- Randall Klein, Montessori teacher and early reading specialist

For the past several months, 
I have been gradually introducing Elise 
to the letters of the alphabet.

Before that, we played LOTS of language games
- and still do! -
like "I spy," the blending game, and matching.

How did I know Elise was ready to make the leap to letters?

First, I noticed that her phonemic awareness was growing,
and that she was able to identify the beginning sounds of most words.

Second, I couldn't deny her curiosity about letters any longer!
I had already casually told her the sounds of a few letters,
and she soaked them up like a sponge.

I really wanted her to learn the letter sounds,
and I realized that if I didn't act quickly,
the rest of the world was going to teach her the names first!


Once I decided to go for it,
the first thing I did was make an Alphabet Story for us to point and sing to
that corresponded with Randall Klein's Stand Up Alphabet Cards.


(sing the letter sounds to the tune of "Up on a House Top")

a-a-apple, b-b-bird. c-c-cat, d-d-duck,
e-e-elephant, f-f-fish, g-g-goat, h-h-house,
i-i-igloo, j-j-jet. k-k-kite, lll-lion,
m-m-moon, n-n-nest, o-o-octopus, p-p-pear,
q-q-queen, rrr-rooster, s-s-sun, t-t-turtle,
u-u-umbrella, v-violin, w-w-whale, x-as in x-ray,
y-y-yarn so much fun, z-z-zebra really can run, 
we just sang our alphabet song, and everybody sang along!


Here's a close-up of our pointer, if you're curious.  ;)
It's a big hit!
We use it for our calendar, too.


Teach the alphabetic principle before you teach the alphabet.
- Randall Klein

When I present a new letter to Elise,
I put together a little tray like the one pictured above.
First, we look at the Alphabet Object, and talk about its beginning sound.
A queen!  What sound does queen start with?  
Yes!  /q/queen - queen starts with /q/.

Then, I'll associate the sound with the Sandpaper Letter.
This letter makes the sound /q/, just like /q/queen.
Elise and I take a few turns tracing the Sandpaper Letter with our finger 
and making the letter's sound.  
q-q-q

 (Sandpaper Letters from Pollywog Learning Products on Esty.)


Next, we'll "read" the new Stand Up Alphabet Card together.


This is what the materials look like on Elise's language shelf.
- New Letter Tray, Sandpaper Letters and Alphabet Objects, and Stand Up Alphabet Cards -

If you're wondering, I have been introducing the letters in no particular order
other than what Elise is interested in 
and what Alphabet Objects I've been able to make or scrounge up!

Randall Klein recommends the following clusters:

a g h m s, 
c d l o t,
f i p r u, 
e j k n w, 
b v y z q x.


Sometimes we set up several Stand-Up Alphabet Cards on a rug,
and I'll challenge Elise to find certain letters for me.
Can you please bring me /a/apple?
If she brings back a different card than the one I've asked for,
I simply say, Let's see what you brought.  You found /b/bird!

Once I know that Elise knows a letter,
I usually ask for it just by sound.
Can you find /e/?

Sometimes Elise and I will switch roles,
and she'll ask ME to bring HER letters.
This is a really great way to discover what she knows!


OK, now for those sandpaper letters and objects...


We play a lot of simple matching games with these materials.
We also take turns flipping the letters over and knocking to see "who's there."

When it comes to these kinds of games,
repetition is key,
and it has to be quick and fun!


Our all-time favorite thing to do with the Alphabet Objects?
Put them on the Alphabet Quilt!
My awesome mom made Elise this quilt just for this very purpose,
and it is so much fun!


We set it up right underneath the Alphabet Story on the wall,
so Elise can check her work and sing.


/e/elephant is always a favorite!  :)

As you've probably noticed, for continuity in the beginning,
we've been associating the same objects/pictures with the same letters.
- For example, /a/ is always an apple. -

As Elise becomes familiar with a letter,
she easily associates it with other things that begin with the same sound.
More on that later, though!  

You can visit Randall Klein at Early Reading Mastery and The Age of Montessori.
I refer to this handout he shares on his Early Reading Mastery site all the time:

Thursday, August 27, 2015

sunflowers: flower study part 2

Elise and I have spent the past few weeks doing a "flower study."  Read part 1 here!

I've decided to try dedicating a little space in our classroom
each month to a special song or poem.
(Yes!  Elise has her own classroom now - I'll share more soon!)
From the classroom window, we are able to see dozens of sunflowers
and watch goldfinches and chickadees feasting on their seeds.
A sunflower song seemed like the perfect first choice...

Sunflower by Sanford Jones
Sunflower, sunflower yellow and round.
You are the prettiest flower I've found.
Tall, straight, full of grace...
I love the light in your bright yellow face!

This song can also be played on the Montessori bells.  


We are using this homemade sunflower puzzle
to learn the names of the parts of the sunflower plant:
roots, stem, leaves, and flower.
(An older child may enjoy labeling the parts or matching 3 part cards like these.)


The puzzle pieces all button together,
which is great because Elise is in a sensitive period for buttoning!


One morning, after buttoning the petals to the seed part of the flower,
we decided to go investigate some real sunflower seeds...


See?  We've even got sunflowers growing out of the sidewalk!


We watched bees drinking nectar and gathering pollen...


And observed that some of the flowers were missing seeds
- could it be the goldfinches?!


We chose a few flowers that were done blooming to cut and bring inside.


We spent the afternoon pretending to be birds,
using tweezers to pull out seeds!

This was always a popular lesson in my classroom 
and it has been so much fun sharing it with Elise,
who eats all the seeds on the spot, of course! 

Wednesday, July 22, 2015

matching pictures to pictures


As you may remember, we do A LOT of matching around here...

Elise first matched objects to objects,
and now she's been busy matching pictures to pictures.

Just the thing for strengthening the visual discrimination 
of a little person who's becoming more and more curious about letters and numbers!

Matching picture activities are pretty straightforward to put together - 
all you need are six (ish!) pairs of identical images (less pairs for beginners, more for those wanting a challenge). 
Montessori Printshop and Montessori for Everyone offer many free or inexpensive sets of cards to download and print.  Postcards, concentration/memory game cards, and photographs are also good options.  

OK, ready for our favorite matching picture activity?

Calendars!


Please tell me you hoard old calendars, too, right?!  
Some are just so lovely, they're hard to recycle at the end of the year...  

Anyway, now you can put those old calendars to use!  Cut out and laminate the sample images from the back of a calendar to create little cards.  Attach small pieces of sticky back velcro, and put the little cards in a basket.  


Next, cut apart the main calendar pages and attach the opposite pieces of sticky back velcro to the lower, right corners.  Hang the calendar pages all around the classroom/house/wherever.


Ready, set, match!!!

Elise loves running around the house, looking for matches -
it's kind of like a scavenger hunt.  :)

Want to see a blast from the past?
This was a popular activity back in my teaching days - check it out here!

Happy summer, friends!

Wednesday, March 5, 2014

toddler threading: cardboard tube "beads"


A few reasons threading is so great for toddlers:
  • strengthens fine motor control
  • encourages concentration
  • develops hand-eye coordination
  • supports a sense of order and sequence
  • provides direct preparation for sewing
  • provides indirect preparation for math and language


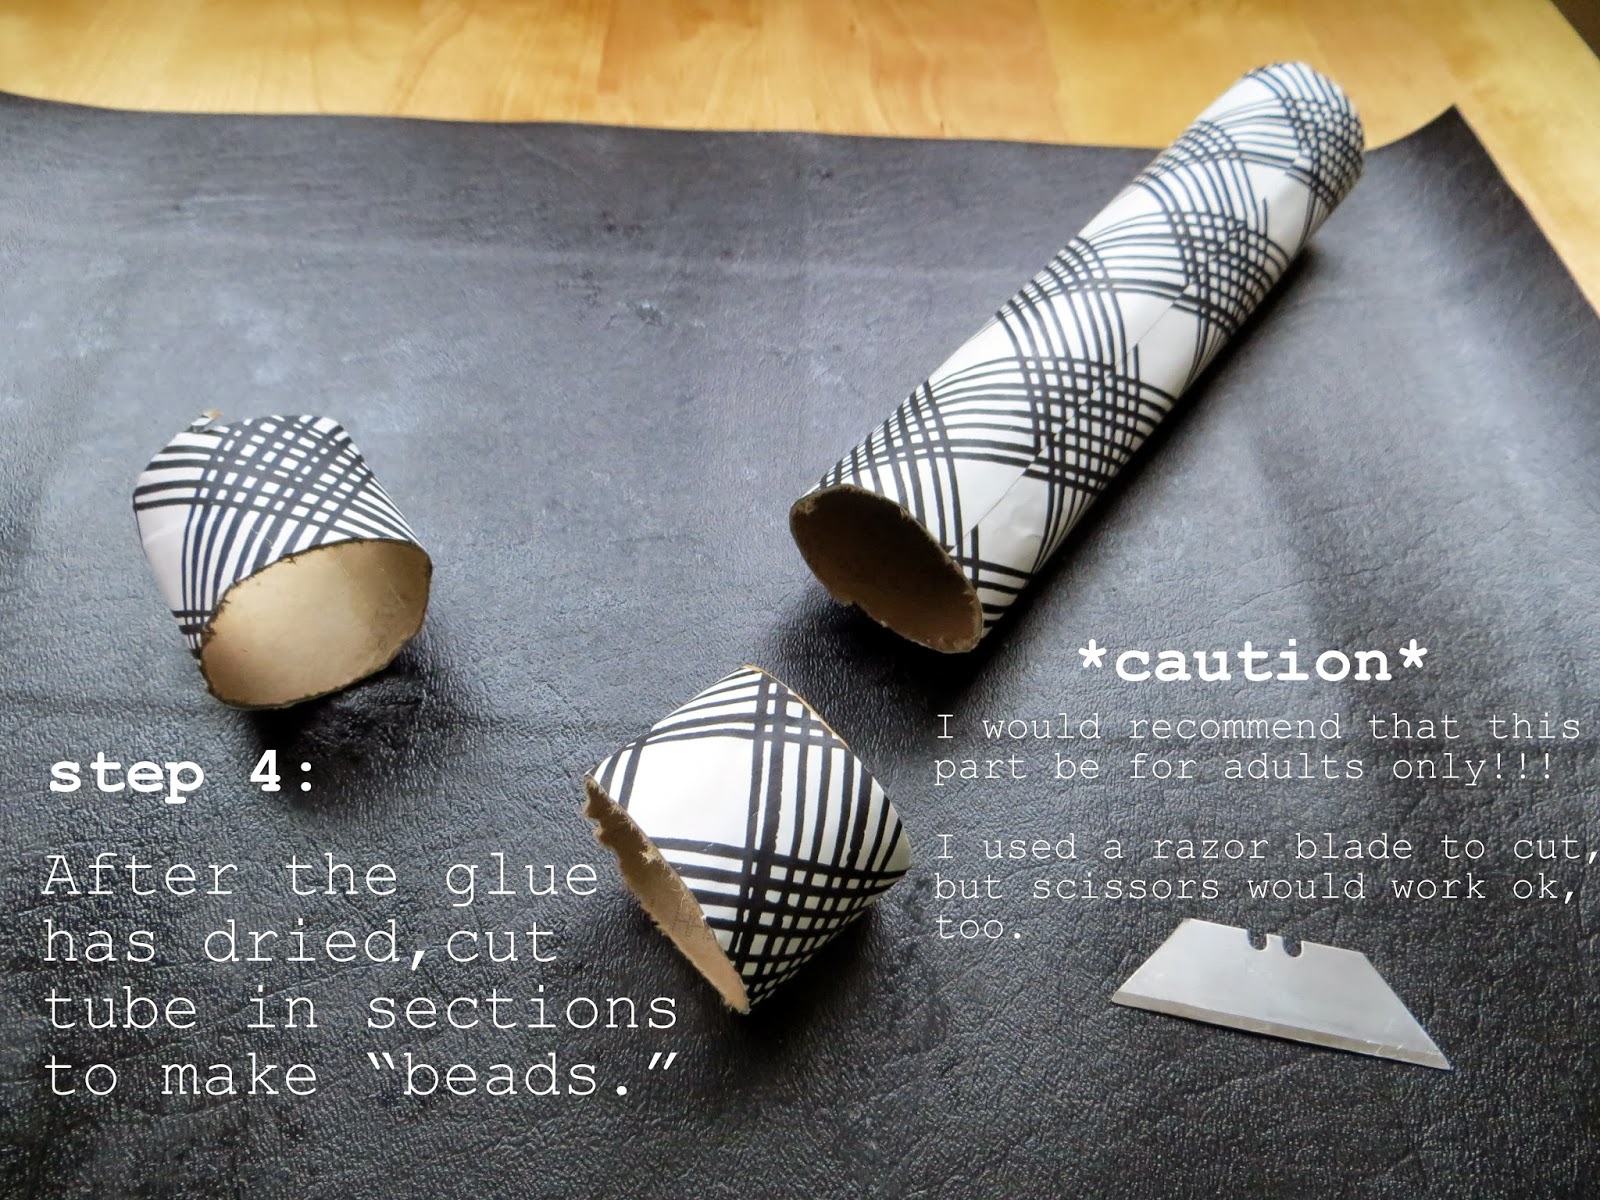
While Elise seemed ready to give threading a try, I didn't feel ready to spend $30 on toddler beads! Deb from Sixtine et Victoire shared some lovely threading and beading activities awhile back, and I remembered that one of them was simply made out of cut up paper towel and toilet paper tubes.  Free AND easy to make?  Woo hoo!  Plus, the large size of the cardboard tube "beads" would make them easier to thread and pose less of a choking risk if E decided to do any oral exploring.  

To class up our cardboard tubes a bit, Elise and I glued on some leftover wrapping paper before I cut them into "beads." If you're interested, please scroll down for a little photo tutorial. I know, it's probably a no-brainer, but sometimes detailed explanations come in handy - especially if your toddler is teething, or something, and you're sleep-deprived like me.  :)


^^Elise wore her threaded cardboard tube "beads" as a necklace all morning!^^

Of course, you don't have to make a necklace - half the fun of threading is in the un-threading!  ;)

Monday, February 24, 2014

hand-knit story props for The Mitten by Jan Brett

I'm so excited to share these little animals I knit to go along with The Mitten by Jan Brett!  Elise and I both love them so much, we're having trouble deciding who gets to sleep with them at night...  ;)

It was so much fun making this beloved story come to life.  Elise knew exactly what I was up to - she even helped me choose the yarn!

Whenever she overheard me telling someone about my project, she would start sneezing like the bear does at the end of the story,"Aaaa-choooo!!!!"

The Mitten is one of those stories that is especially fun to retell with props...

 Alone...

 ...or with a friend!

For all of you knitters out there, I made most of the animals from patterns I found on Ravelry.  The badger, mole, and mouse were my own inventions!  

Here are a few pattern links, if you're feeling inspired to make your own set:

Find me on Ravelry here and Facebook here!

Wednesday, October 23, 2013

spiderweb felt board


A spooky felt board is just right for little fingers in search of some Halloween fun!

materials

  • felt or batting (I used batting)
  • embroidery floss
  • plastic spiders 
  • thrifted frame 

First, sew the web onto the batting by making BIG stitches with the embroidery floss - each section of the web should be just one stitch.  Then, wrap the batting around a piece of cardboard, and stick it into the frame.  Finally - the fun part - arrange the spiders on the web.  They will sort of stick by snagging on the batting, but make them more secure by tucking a leg or two into the web.  


I hung our spiderweb felt board up in Elise's costume corner
this place is seriously the most popular spot in the house right now! 


Easy, right?  But. are you brave enough to stick the spiders on???  
EEEEK!!!!!!

More Halloween fun here.

Tuesday, September 10, 2013

2 upcycled jug activities

Nothing could be more satisfying than dropping a cylinder-shaped block into a milk jug or pushing a cotton ball through the neck of a glass bottle, right?  What - no? You can think of lots of things you'd rather do?!  Well, you're obviously not a one-year-old then!  Elise LOVES these kinds of activities right now.  How can I tell?  She repeats them again and again, with concentration so strong, she barely makes a sound - just the occasional little happy noise.  :)

Activities like these are great for strengthening fine motor control and building spacial awareness.  Plus, they're a snap to put together - just look in your recycling bin!

pushing cotton balls into a glass bottle

materials needed:
  • glass bottle with a short neck
  • cotton balls in a dish
Elise eventually filled the whole bottle with cotton balls.  Afterwards, I pulled them all out with tweezers while she napped - it didn't take as long as you would think!

dropping cylinder-shaped blocks into a milk jug

materials needed:
  • milk jug with a hole cut in the side
  • cylinder-shaped blocks (Ours are part of a set given to us by a neighbor - I think they're Melissa & Doug.  If you don't have blocks like these, shape sorters usually have a cylinder-shaped block.)
When you're cutting the hole in the side of the milk jug, make sure you leave an inch or two of plastic at the bottom.  The first time I did this, I cut too close to the bottom and the blocks bounced out of the jug.  BTW, the purpose of cutting a hole in the side of the jug is so that your child can reach in, grab the block and repeat the activity.  Then, you won't have to spend those precious moments of nap time trying to get the blocks out of the jug.  You can just sit back and sip a mocha, or fold laundry, or whatever!     

Thursday, June 13, 2013

looking back at baby elise part 3: handmade baby

Elise turns one in a month!!!  Over the next few weeks, I'm going to celebrate by posting some of my favorite memories of her first months that I haven't shared on itty bitty love.  :)
  
A handful of items made from FREE patterns that Elise has used and loved...  


 monster pants

burp cloths
tutorial:  mama says sew

reversible flannel receiving blanket

braided balls

 super simple skirt with lining
tutorial:  Straight Grain

Happy crafting!
Related Posts Plugin for WordPress, Blogger...